Adafruit_SSD1306库学习

转载声明
本文章原地址:[Adafruit_SSD1306库学习-CSDN博客](https://blog.csdn.net/qq_41477556/article/details/112311181)

1.前言

在这里了解一下Adafruit_SSD1306和Adafruit_GFX这两个库

Adafruti_SSD1306是SSD1306 OLED屏幕的专用显示库

  • Adafruit_GFX库是LCD和OLED屏幕的通用父类,这是一个父类的图形库

  • Adafruit_GFX要与屏幕的专用显示库一同使用,子类库依赖父类库

    例如:

    1. SSD1306 OLED显示器:Adafruit_GFX和Adafruit_SSD1306
    2. ST7735 1.8英寸彩色LCD显示器:Adafruit_GFX,Adafruit_ZeroDMA 和 Adafruit_ST7735

2.SSD1306显示器介绍

OLED显示器可以抽象为像素点,SSD1306显示器就是128x64像素点阵。
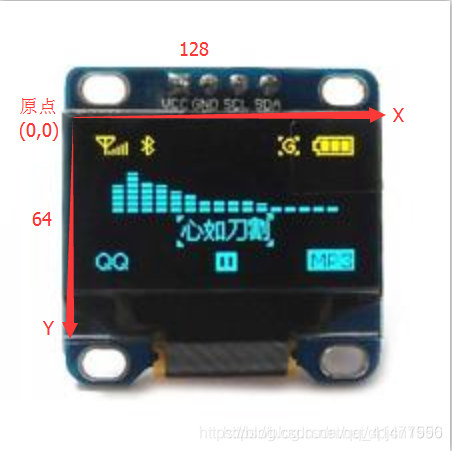
OLED显示屏有四个引脚:

SDA:数据线

SCK:时钟线

VDD:电源线(3.3V)

GND:地线

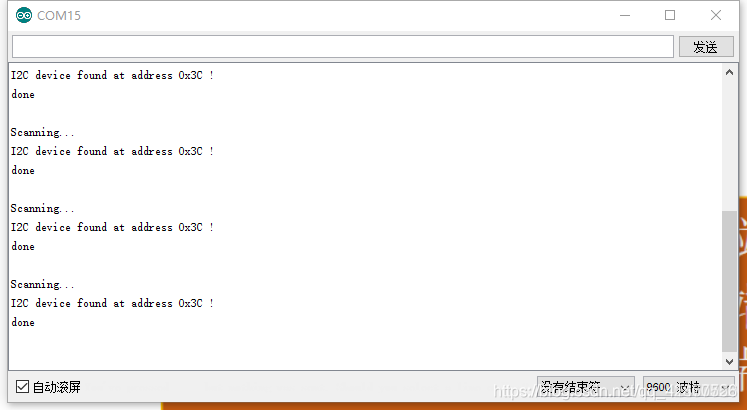
SSD1306驱动的IIC接口的显示屏的默认通信地址为0x3c/0x3d,具体的可通过如下程序查询:

1
2
3
4
5
6
7
8
9
10
11
12
13
14
15
16
17
18
19
20
21
22
23
24
25
26
27
28
29
30
31
32
33
34
35
36
37
38
#include <Wire.h>  

void setup(){
Wire.begin();
Serial.begin(9600);
Serial.println("\nI2C Scanner");
}
void loop(){
byte error, address;
int nDevices;
Serial.println("Scanning...");
nDevices = 0;
for (address = 1; address < 127; address++ ){
// The i2c_scanner uses the return value of
// the Write.endTransmisstion to see if
// a device did acknowledge to the address.
Wire.beginTransmission(address);
error = Wire.endTransmission();
if (error == 0){
Serial.print("I2C device found at address 0x");
if (address < 16)
Serial.print("0");
Serial.print(address, HEX);
Serial.println(" !");
nDevices++;
}else if (error == 4){
Serial.print("Unknow error at address 0x");
if (address < 16)
Serial.print("0");
Serial.println(address, HEX);
}
}
if (nDevices == 0)
Serial.println("No I2C devices found\n");
else
Serial.println("done\n");
delay(5000); // wait 5 seconds for next scan
}

打开串口监视器可查看通信地址

3.库方法介绍

3.1.初始化 构造器 (声明OLED显示器)

Adafruit_ssd1306初始化构造器

SSD1306包括IIC和SPI两个版本,本篇现只介绍IIC版本,后续会更新SPI版本

1
2
Adafruit_SSD1306(uint8_t w, uint8_t h, TwoWire *twi=&Wire, int8_t rst_pin=-1,
uint32_t clkDuring=400000UL, uint32_t clkAfter=100000UL);

参数介绍:

w:屏幕宽度像素

h:屏幕高度像素

twi:IIC总线实例,默认为&wrie

rst_pin:复位引脚,没有则填-1

clkDuring:SSD1306库调用期间的传输速率,默认为_400000(400KHz)_

clkAfter:SSD1306库非调用期间的传输速率,为了兼容IIC总线上其它设备,默认为_100000(100KHz)_

使用代码实例

1
2
3
4
5
6
7
8
9
10
#include <SPI.h>
#include <Wire.h>
#include <Adafruit_GFX.h>
#include <Adafruit_SSD1306.h>
//屏幕分辨率
#define SCREEN_WIDTH 128 // OLED display width, in pixels
#define SCREEN_HEIGHT 64 // OLED display height, in pixels
// Declaration for an SSD1306 display connected to I2C (SDA, SCL pins)
#define OLED_RESET 4 // Reset pin # (or -1 if sharing Arduino reset pin)
Adafruit_SSD1306 display(SCREEN_WIDTH, SCREEN_HEIGHT, &Wire, OLED_RESET);

3.2 OLED初始化方法

3.2.1 begin方法

1
2
3
4
5
boolean Adafruit_SSD1306::begin(
uint8_t switchvcc=SSD1306_SWITCHCAPVCC,
uint8_t i2caddr=0,
boolean reset=true,
boolean periphBegin=true)

参数介绍:

switchvcc: OLED的电压

i2caddr: OLED的通信地址

使用代码实例:

1
display.begin(SSD1306_SWITCHCAPVCC, 0x3C); 

3.2.2 clearDisplay ------清屏

  • 此方法只清楚单片机缓存,不会显示在屏幕上,需配合display清屏
1
void Adafruit_SSD1306::clearDisplay(void)

使用代码实例

1
display.clearDisplay();   // clears the screen and buffer

3.2.3 display  ------ 显示内容

  • display方法才会把内容推到显示屏上

使用代码实例

1
display.diaplay();

3.3绘制类方法

因为Adafruit_SSD1306是继承的Adafruit_GFX,所以绘制类方法分为Adafruit_GFX的父类方法和Adafruit_SSD1306的子类方法:

Adafruit_GFX的父类方法:

  • drawCircle——绘制空心圆

  • fillCircle——绘制实心圆

  • drawTriangle——绘制空心三角形

  • fillTriangle——绘制实心三角形

  • drawRoundRect——绘制空心圆角方形

  • fillRoundRect——绘制实心圆角方形

  • drawBitmap——绘制Bitmap图像

  • drawXBitmap——绘制XBitmap图像

  • drawGrayscaleBitmap

  • drawRGBBitmap

  • drawChar——绘制字符

  • getTextBounds——绘制单个字母

  • setTextSize——设置字号

  • setFont——设置字体

  • setCursor——设置光标起始坐标

  • setTextColor——设置字体颜色

  • setTextWrap

Adafruit_SSD1306子类方法:

  • drawPixel——绘制像素点
  • drawFastHLine——绘制水平线
  • drawFastVLine——绘制垂直线
  • startscrollright——滚动到右边
  • startscrollleft——滚动到左边
  • startscrolldiagright——沿对角线右滚动
  • startscrolldiagleft——沿对角线左滚动
  • stopscroll——停止滚动

3.3.1 drawPixel——绘制像素点

1
void Adafruit_SSD1306::drawPixel(int16_t x, int16_t y, uint16_t color) 

参数介绍:

x:x坐标,横坐标

y:y坐标,纵坐标

color:绘制颜色,SSD1306_BLACK , SSD1306_WHITE , SSD1306_INVERT

使用代码实例

1
2
3
4
display.clearDisplay();   // clears the screen and buffer
display.drawPixel(64, 32, WHITE);
display.display();
delay(2000);

3.3.2 drawFastHLine——绘制水平线

1
2
void Adafruit_SSD1306::drawFastHLine(
int16_t x, int16_t y, int16_t w, uint16_t color)

参数介绍:

x:起始坐标x,取值范围:0 ~ width-1

y:起始坐标y,取值范围:0 ~ height-1

w:水平线长度,单位:像素

color:水平线颜色:SSD1306_BLACK , SSD1306_WHITE , SSD1306_INVERT

1
2
3
4
display.clearDisplay();
display.drawFastHLine(0,10,50,SSD1306_WHITE);
display.display();
delay(2000);

3.3.3 drawFastVLine——绘制竖直线

1
2
void Adafruit_SSD1306::drawFastVLine(
int16_t x, int16_t y, int16_t h, uint16_t color)

参数介绍:

x:起始坐标x,取值范围:0 ~ width-1

y:起始坐标y,取值范围:0 ~ height-1

h:竖直线长度

color:竖直线颜色:SSD1306_BLACK, SSD1306_WHITE or SSD1306_INVERT

使用代码示例:

1
2
3
4
display.clearDisplay();
display.drawFastVLine(0,10,50,SSD1306_WHITE);
display.display();
delay(2000);

3.3.4 drawLine——绘制线

1
2
void Adafruit_GFX::drawLine(int16_t x0, int16_t y0, int16_t x1, int16_t y1,
uint16_t color)

参数介绍:

x0:起始坐标x

y0:起始坐标y

x1:终点坐标x

y1:终点坐标y

color:线颜色:SSD1306_BLACK, SSD1306_WHITE or SSD1306_INVERT

代码示例:

1
2
3
4
display.clearDisplay();
display.drawLine(10,10,100,60,SSD1306_WHITE);
display.display();
delay(2000);

3.3.5 drawRect——绘制空心矩形

1
2
void Adafruit_GFX::drawRect(int16_t x, int16_t y, int16_t w, int16_t h,
uint16_t color)

参数介绍:

x:左上角x坐标

y:左上角y坐标

w:矩形宽

h:矩形高

color:矩形颜色:SSD1306_BLACK, SSD1306_WHITE or SSD1306_INVERT

代码示例:

1
2
3
4
5

display.clearDisplay();
display.drawRect(0,0,128,64,SSD1306_WHITE);
display.display();
delay(20);

3.3.6 fillRect——绘制实心矩形

1
2
void Adafruit_GFX::fillRect(int16_t x, int16_t y, int16_t w, int16_t h,
uint16_t color)

参数介绍:

x:左上角x坐标

y:左上角y坐标

w:矩形宽

h:矩形高

color:矩形颜色:SSD1306_BLACK, SSD1306_WHITE or SSD1306_INVERT

代码示例:

1
2
3
4
display.clearDisplay();
display.fillRect(20,10,88,44,SSD1306_WHITE);
display.display();
delay(2000);

3.3.7 fillScreen —— 点亮全屏

1
void Adafruit_GFX::fillScreen(uint16_t color)

参数介绍:

color:颜色:SSD1306_BLACK, SSD1306_WHITE or SSD1306_INVERT

代码示例:

1
2
3
4
display.clearDisplay();
display.fillScreen(SSD1306_WHITE);
display.display();
delay(2000);

3.3.8 drawCircle —— 绘制空心圆

1
2
void Adafruit_GFX::drawCircle(int16_t x0, int16_t y0, int16_t r,
uint16_t color)

参数介绍:

x0:圆心x坐标

y0:圆心y坐标

r:半径

color:颜色:SSD1306_BLACK, SSD1306_WHITE or SSD1306_INVERT

代码示例:

1
2
3
4
display.clearDisplay();
display.drawCircle(64,32,32,SSD1306_WHITE);
display.display();
delay(2000);

3.3.9 fillCircle —— 绘制实心圆

1
2
void Adafruit_GFX::fillCircle(int16_t x0, int16_t y0, int16_t r,
uint16_t color)

参数介绍:

x0:圆心x坐标

y0:圆心y坐标

r:半径

color:颜色:SSD1306_BLACK, SSD1306_WHITE or SSD1306_INVERT

代码示例:

1
2
3
4
display.clearDisplay();
display.fillCircle(64,32,31,SSD1306_WHITE);
display.display();
delay(2000);

3.3.10 drawTriangle —— 绘制空心三角形

1
2
3
4
void Adafruit_GFX::drawTriangle(int16_t x0, int16_t y0,
int16_t x1, int16_t y1,
int16_t x2, int16_t y2,
uint16_t color)

参数介绍:

x0:第一个顶点x坐标

y0:第一个顶点y坐标

x1:第二个顶点x坐标

y1:第二个顶点y坐标

x2:第三个顶点x坐标

y2:第三个顶点y坐标

color:颜色:SSD1306_BLACK, SSD1306_WHITE or SSD1306_INVERT

代码示例:

1
2
3
4
display.clearDisplay();
display.drawTriangle(63,0, 0,63, 127,63, SSD1306_WHITE);
display.display();
delay(2000);

3.3.11 fillTriangle —— 绘制实心三角形

1
2
3
4
void Adafruit_GFX::fillTriangle(int16_t x0, int16_t y0,
int16_t x1, int16_t y1,
int16_t x2, int16_t y2,
uint16_t color)

参数介绍:

x0:第一个顶点x坐标

y0:第一个顶点y坐标

x1:第二个顶点x坐标

y1:第二个顶点y坐标

x2:第三个顶点x坐标

y2:第三个顶点y坐标

color:颜色:SSD1306_BLACK, SSD1306_WHITE or SSD1306_INVERT

代码示例:

1
2
3
4
display.clearDisplay();
display.fillTriangle(63,0, 0,63, 127,63, SSD1306_WHITE);
display.display();
delay(2000);

3.3.12 drawRoundRect —— 绘制空心圆角矩形

1
2
void Adafruit_GFX::drawRoundRect(int16_t x, int16_t y, int16_t w,
int16_t h, int16_t r, uint16_t color)

参数介绍:

x:左上角x坐标

y:左上角y坐标

w:矩形宽

h:矩形高

r:矩形圆角半径

color:颜色:SSD1306_BLACK, SSD1306_WHITE or SSD1306_INVERT

代码示例:

1
2
3
4
display.clearDisplay();
display.drawRoundRect(10,5,107, 43,3, SSD1306_WHITE);
display.display();
delay(2000);

3.3.13 fillRoundRect —— 绘制实心圆角

1
2
void Adafruit_GFX::fillRoundRect(int16_t x, int16_t y, int16_t w,
int16_t h, int16_t r, uint16_t color)

参数介绍:

x:左上角x坐标

y:左上角y坐标

w:矩形宽

h:矩形高

r:矩形圆角半径

color:颜色:SSD1306_BLACK, SSD1306_WHITE or SSD1306_INVERT

代码示例:

1
2
3
4
5
//绘制实心圆角矩形
display.clearDisplay();
display.fillRoundRect(10,5,107,53,3, SSD1306_WHITE);
display.display();
delay(2000);

3.3.14 drawBitmap —— 绘制Bitmap图像

  • 使用PROGMEM的图形

    1
    2
    drawBitmap(int16_t x, int16_t y, const uint8_t bitmap[],
    int16_t w, int16_t h, uint16_t color)

    参数介绍:

    x:左上角x坐标

    y:左上角y坐标

    bitmap[]:图形数据

    w:图形宽

    h:图形高

    color:颜色:SSD1306_BLACK, SSD1306_WHITE or SSD1306_INVERT

    1
    2
    drawBitmap(int16_t x, int16_t y, const uint8_t bitmap[],
    int16_t w, int16_t h, uint16_t color, uint16_t bg)

    参数介绍:

    bg:背景颜色(部分显示器支持)

  • 使用ram的图形

    1
    2
    drawBitmap(int16_t x, int16_t y, uint8_t *bitmap,
    int16_t w, int16_t h, uint16_t color)

    参数介绍:

    x:左上角x坐标

    y:左上角y坐标

    bitmap:图形数据

    w:图形宽

    h:图形高

    color:颜色:SSD1306_BLACK, SSD1306_WHITE or SSD1306_INVERT

    1
    2
    drawBitmap(int16_t x, int16_t y, uint8_t *bitmap,
    int16_t w, int16_t h, uint16_t color, uint16_t bg)

    bg:背景颜色(部分显示器支持)

代码示例

1
2
3
4
5
6
7
8
9
10
11
12
13
14
15
16
17
18
19
20
21
22
23
24
25
26
27
28
29
30
31
32
33
34
35
36
37
38
39
40
41
42
43
44
45
46
47
48
49
50
51
52
53
54
55
56
57
58
59
60
61
62
63
64
65
66
67
68
69
70
71
72
73
//Bimap图像数据
static const unsigned char PROGMEM BimptPhoto_128x64[]={
0x00,0x00,0x00,0x00,0x00,0x00,0x00,0x00,0x00,0x00,0x00,0x00,0x00,0x00,0x00,0x00,
0x00,0x00,0x00,0x00,0x00,0x00,0x03,0xF0,0x01,0xF0,0x03,0x80,0x00,0x00,0x00,0x00,
0x00,0x00,0x00,0x00,0x00,0x00,0x02,0x1E,0x3F,0x1C,0x1E,0xC0,0x00,0x00,0x00,0x00,
0x00,0x00,0x00,0x00,0x00,0x00,0x02,0x03,0xE0,0x07,0xF0,0x80,0x00,0x00,0x00,0x00,
0x00,0x00,0x00,0x00,0x00,0x00,0x02,0x00,0x00,0x00,0x00,0x80,0x00,0x00,0x00,0x00,
0x00,0x00,0x00,0x00,0x00,0x00,0x03,0x00,0x00,0x00,0x00,0xC0,0x00,0x00,0x00,0x00,
0x00,0x00,0x00,0x00,0x00,0x00,0x01,0x00,0x00,0x00,0x00,0x40,0x00,0x00,0x00,0x00,
0x00,0x00,0x00,0x00,0x00,0x00,0x03,0x00,0x00,0x00,0x00,0x40,0x00,0x00,0x00,0x00,
0x00,0x00,0x00,0x00,0x00,0x00,0x01,0x00,0x00,0x00,0x00,0x40,0x00,0x00,0x00,0x00,
0x00,0x00,0x00,0x00,0x00,0x00,0x01,0x0F,0xFE,0x07,0xFF,0xC0,0x00,0x00,0x00,0x00,
0x00,0x00,0x00,0x00,0x00,0x00,0x01,0x70,0x03,0xFC,0x00,0x00,0x00,0x00,0x00,0x00,
0x00,0x00,0x00,0x00,0x00,0x00,0x01,0x80,0x00,0x00,0x00,0x00,0x00,0x00,0x00,0x00,
0x00,0x00,0x00,0x00,0x00,0x00,0x01,0x00,0x00,0x00,0x00,0x00,0x00,0x00,0x00,0x00,
0x00,0x00,0x00,0x00,0x00,0x00,0x01,0x01,0x80,0x00,0x00,0x00,0x00,0x00,0x00,0x00,
0x00,0x00,0x00,0x00,0x00,0x00,0x03,0xFF,0xF8,0x00,0x00,0x00,0x00,0x00,0x00,0x00,
0x00,0x00,0x00,0x00,0x00,0x07,0xFE,0x00,0x0F,0xFE,0x00,0x00,0x00,0x00,0x00,0x00,
0x00,0x00,0x00,0x00,0x00,0x1C,0x00,0x00,0x00,0x03,0x80,0x00,0x00,0x00,0x00,0x00,
0x00,0x00,0x00,0x00,0x00,0x20,0x00,0x00,0x00,0x00,0xC0,0x00,0x00,0x00,0x00,0x00,
0x00,0x00,0x00,0x00,0x01,0xC0,0x00,0x00,0x00,0x00,0x60,0x00,0x00,0x00,0x00,0x00,
0x00,0x00,0x00,0x00,0x01,0x00,0x00,0x00,0x00,0x00,0x20,0x00,0x00,0x00,0x00,0x00,
0x00,0x00,0x00,0x00,0x01,0x00,0x00,0x00,0x00,0x00,0x30,0x00,0x00,0x00,0x00,0x00,
0x00,0x00,0x00,0x00,0x02,0x00,0x00,0x00,0x00,0x00,0x10,0x00,0x00,0x00,0x00,0x00,
0x00,0x00,0x00,0x00,0x06,0x00,0x00,0x00,0x00,0x00,0x10,0x00,0x00,0x00,0x00,0x00,
0x00,0x00,0x00,0x00,0x04,0x00,0x00,0x00,0x00,0x7F,0xD0,0x00,0x00,0x00,0x00,0x00,
0x00,0x00,0x00,0x00,0x04,0x00,0x00,0x00,0x3F,0xC0,0x3E,0x00,0x00,0x00,0x00,0x00,
0x00,0x00,0x00,0x00,0x7F,0xFF,0xFF,0xFF,0xE0,0x00,0x03,0xF0,0x00,0x00,0x00,0x00,
0x00,0x00,0x00,0x00,0xC0,0x00,0x00,0x00,0x00,0x00,0x00,0x1E,0x00,0x00,0x00,0x00,
0x00,0x00,0x00,0x03,0x00,0x00,0x00,0x00,0x00,0x00,0x00,0x03,0x00,0x00,0x00,0x00,
0x00,0x00,0x00,0x06,0x00,0x00,0x00,0x00,0x00,0x00,0x00,0x01,0x80,0x00,0x00,0x00,
0x00,0x00,0x00,0x0C,0x00,0x00,0x00,0x00,0x00,0x00,0x00,0x00,0xC0,0x00,0x00,0x00,
0x00,0x00,0x00,0x08,0x00,0x00,0x00,0x00,0x00,0x00,0x00,0x00,0x20,0x00,0x00,0x00,
0x00,0x00,0x00,0x18,0x00,0x00,0x00,0x00,0x00,0x00,0x00,0x00,0x30,0x00,0x00,0x00,
0x00,0x00,0x00,0x10,0x00,0x00,0x00,0x00,0x00,0x00,0x00,0x00,0x18,0x00,0x00,0x00,
0x00,0x00,0x00,0x30,0x00,0x00,0x00,0x00,0x00,0x00,0x00,0x00,0x08,0x00,0x00,0x00,
0x00,0x00,0x00,0x20,0x00,0x00,0x00,0x00,0x00,0x00,0x00,0x00,0x0C,0x00,0x00,0x00,
0x00,0x00,0x00,0x20,0x00,0x00,0x00,0x00,0x00,0x00,0x00,0x00,0x04,0x00,0x00,0x00,
0x00,0x00,0x00,0x40,0x00,0x00,0x00,0x00,0x00,0x00,0x00,0x00,0x04,0x00,0x00,0x00,
0x00,0x00,0x00,0x40,0x00,0x00,0x00,0x00,0x00,0x00,0x00,0x00,0x06,0x00,0x00,0x00,
0x00,0x00,0x00,0xC0,0x00,0x00,0x00,0x00,0x00,0x00,0x00,0x00,0x02,0x00,0x00,0x00,
0x00,0x00,0x00,0x80,0x00,0x00,0x00,0x00,0x00,0x00,0x00,0x00,0x02,0x00,0x00,0x00,
0x00,0x00,0x01,0x80,0x00,0x00,0x00,0x00,0x00,0x00,0x00,0x00,0x02,0x00,0x00,0x00,
0x00,0x00,0x03,0x00,0x00,0x00,0x00,0x00,0x00,0x00,0x00,0x00,0x03,0x00,0x00,0x00,
0x00,0x00,0x02,0x00,0x00,0x00,0x00,0x00,0x00,0x00,0x00,0x00,0x01,0x00,0x00,0x00,
0x00,0x00,0x06,0x00,0x00,0x00,0x00,0x00,0x00,0x00,0x00,0x00,0x01,0x00,0x00,0x00,
0x00,0x00,0x04,0x00,0x00,0x00,0x00,0x00,0x00,0x00,0x00,0x00,0x00,0x00,0x00,0x00
};
//显示Bimap图像
display.clearDisplay();
display.drawBitmap(0,0,BimptPhoto_128x64,128,64,SSD1306_WHITE);
display.display();
delay(2000);

3.3.15 setTextSize —— 设置字体大小

  • 单参数
1
void Adafruit_GFX::setTextSize(uint8_t s)

参数介绍:

s:字体大小倍数,s为1时为6x8,s为2时为12x16

代码示例:

1
2
3
4
5
6
7
display.clearDisplay();
display.setTextSize(1); //选择字号
display.setTextColor(WHITE); //字体颜色
display.setCursor(0,8);
display.print("setTextSize: 1");
display.display();
delay(2000);
  • 双参数
1
void Adafruit_GFX::setTextSize(uint8_t s_x, uint8_t s_y)

参数介绍:

s_x:字体横向倍数大小

s_y:字体纵向倍数大小

代码示例:

1
2
3
4
5
6
7
display.clearDisplay();
display.setTextSize(1); //选择字号
display.setTextColor(WHITE); //字体颜色
display.setTextSize(1,2);
display.setCursor(0,20);
display.print("setTextSize: 6x16");
delay(2000);

3.3.16 setFont —— 设置字体

1
void Adafruit_GFX::setFont(const GFXfont *f)

参数设置:

f:使用display.print()时的字体,不使用此函数系统默认为6x8

暂时没整明白怎么使用

3.3.17 setCursor —— 设置光标位置

1
void setCursor(int16_t x, int16_t y)

参数介绍:

x:光标顶点x坐标

y:光标顶点y坐标

代码示例:

1
2
3
4
5
6
7
8
9
display.clearDisplay();
display.setTextSize(1); //选择字号
display.setTextColor(WHITE); //字体颜色
display.setCursor(0,0);
display.print("setCursor(0,0)");
display.setCursor(0,8);
display.print("setCursor(0,8)");
display.display();
delay(2000);

3.3.18 setTextWrap —— 设置是否自动换行

1
void setTextWrap(boolean w) { wrap = w; }

参数介绍:

w:true or false

3.4 获取屏幕参数

  • 获取屏幕高度

    1
    int16_t width(void)
  • 获取屏幕宽度

    1
    int16_t height(void)
  • 获取屏幕旋转角度

    1
    uint8_t getRotation(void)
  • 获取光标x坐标

    1
    int16_t getCursorX(void)
  • 获取光标y坐标

    1
    int16_t getCursorY(void)

3.5 屏幕滚动

3.5.1 startscrollright —— 向右滚动

1
void Adafruit_SSD1306::startscrollright(uint8_t start, uint8_t stop)

代码示例:

1
2
3
4
5
6
7
8
9
display.clearDisplay();
display.setTextSize(1); //选择字号
display.setTextColor(WHITE); //字体颜色
display.setCursor(8,32);
display.setTextWrap(false);
display.print("ABC");
display.startscrollright(31,40);
display.display();
delay(5000);

3.5.2 startscrollleft —— 向左滚动

1
void Adafruit_SSD1306::startscrollleft(uint8_t start, uint8_t stop)

代码示例:

1
2
3
4
5
6
7
8
9
display.clearDisplay();
display.setTextSize(1); //选择字号
display.setTextColor(WHITE); //字体颜色
display.setCursor(110,32);
display.setTextWrap(false);
display.print("abcdefghiJKLMNOPQRSTUVWXYZ");
display.startscrollleft(31,40);
display.display();
delay(5000);

3.5.3 stopscroll —— 停止滚动

1
void Adafruit_SSD1306::stopscroll(void)

4.参考资料及博客

深入学习 OLED Adafruit_SSD1306库(8266+arduino)

关于Arduino&SSD1306OLED(IIC)显示的学习


Adafruit_SSD1306库学习
https://ka5fxt.cn/2026/04/07/Adafruit-SSD1306库学习/
发布于
2026年4月7日
许可协议